Working with Assignments and Reports
On this page:
- Opening an Assignment or Report
- Retrieving Data and Changing Filter Selections
- Entering and Saving Data in Assignments
- Closing an Assignment or Report
- Submitting Data in an Assignment for Approval
- Reviewing and Approving/Rejecting an Assignment
Opening an Assignment or Report
Use the following steps to start True Sky and open an Assignment or Report:
- Open Excel.
- Select the “True Sky” tab in the Ribbon Bar.
- Press the “Hub” The “True Sky Hub” pane will appear.
- Depending on your particular configuration you may be asked to select a Connection and/or a Workspace. If you do not have multiple Connections or Workspaces in you environment, then these selections will not be available. Please contact your True Sky Administrator on which selections you should make if given multiple options.
- Assignments or Reports may (or may not) also be grouped into folders as determined by your True Sky Administrator. Clicking on a folder expands the folder to show the Assignments or Reports contained within.
- Select the Assignment or Report that you wish to work on as well as a Level you wish to open if available.
- Press the “Open” button at the bottom of the Hub.
- The Assignment or Report will open along with Filters Pane.
- At this point no data has been retrieved as of yet. See the next section for information related to Filters and retrieving of data.
Retrieving Data and Changing Filter Selections
Once an Assignment or Report has been opened you must select one or more True Sky Worksheets and within each of those True Sky Worksheets select from the Filter Pane those Dimension Members you wish to retrieve.
- With the Filters Pane open click on any of the Worksheet Names shown in the upper portion of the Pane. Based on the design you may only see one True Sky Worksheet or there may be multiple True Sky Worksheets available to select. As you highlight different individual Worksheets you will see the available Filters in the lower section change.
NOTE: Only those True Sky Worksheets that have a check in the box to the left of their name will retrieve data.
Each True Sky Worksheet may have default “Filter” selections already made by the Template Designer. You can use these default selections or you can select your own dimension members for each Filter. To edit the selections, press the “Edit” button to the right of the individual Filter entry. The “Dimension Member Selection” pop-up window will appear.
Depending on design, you may only be able to select one Dimension Member at a time or multiple Dimensions Members. Also, depending on design, you may or may not be able to select “roll-up” levels.
NOTE: Only the data that you have security rights to view will appear in the Dimension Member Selection pop-up window. This data may be different from other users working with the same Assignment or Report.
NOTE: True Sky supports retrieving data at a “roll-up” level or a “leaf level”: An example of leaf level data would be the cities of Seattle and Spokane where a roll-up level would be selection of Washington. True Sky only allows data entry at a leaf level.
- When satisfied with the “Filter” values, press the “Retrieve” button on the bottom of the Filter Pane. The data associated to the selected Filter values will be returned to the Worksheet.
NOTE: Only the data that you have security rights to view will appear during the retrieve. This data may be different from other users working with the same Filter selections.
NOTE: After a Retrieve, you need to click the “Edit” button (now appearing) at the bottom of the Filter Pane to choose different Filter selections for additional Retrieves. When you click the Edit button the data currently displayed in the Worksheet will clear and reset back to its default state.
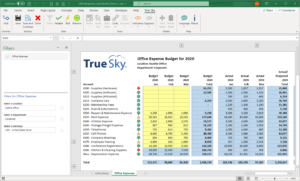
Assignment / Report After Data Retrieval
Entering and Saving Data in Assignments
Remember that only Assignments allow for the entering of data and attempting to enter data in a Report or in a non-editable section of an Assignment Worksheet will generate an error message, Entering data in True Sky is identical to entering data in a standard Excel Worksheet. You can type number in manually, perform copy/past from other cells and use Excel formulas. To save your data press the “Save” or “Save and Continue” (for specifically designated Templates in the True Sky Ribbon Bar.
NOTE: Only the results of the formulas you type will be saved in True Sky and not the formulas themselves

Save and Save and Continue Buttons
Closing an Assignment or Report
To close an Assignment or Report, simply click on the “Close” button in the True Sky Ribbon Bar.

Close Assignment/Report Button
Submitting Data in an Assignment for Approval
When you have completed the data entry in your Assignment your organization may wish for you to submit your data for approval. Depending on the Assignment parameters including the Security Group and Approval Tree selected and the Drivers (i.e., filters/slicers/dimensions) used for managing the approval flow, you may have one or more Assignment Tasks for you to enter against and to submit for approval.
There are a few important things to keep in mind:
- You are submitting your data for approval, not the Excel Worksheet itself.
- Once you submit your data for a particular Driver or Driver combination for approval you can no longer edit that data. You can view the data but can only edit it if the person after you in the approval process (or a True Sky Administrator) rejects your submission. Upon rejection, data entry will become available again. If you have multiple Assignment Tasks, you can submit for one while leaving the other Assignment Tasks unsubmitted and available for editing.
- Assignments not meeting certain Validations (discussed later in this manual) may be prevented from being submitted for approval.
- If you are the first person in the process, you need to open your Assignment and retrieve data and press the “SAVE” button at least once before you will be allowed to submit for approval and Assignment Task.
- Pure reports do not utilize an approval or submission process.
To submit your data for approval, save your changes and then:
- Close the Assignment you wish to submit for approval.
- Open the “Hub” and select the “Assignment” and your “Assignment Level”.
- Press the “View Status” button at the bottom of the screen.
- In the “View Status” window, click on one or more of the Dimension Members (e.g., Department, Location, Customer, etc.) being used as Drivers that you wish to submit. You can choose to work on one item at a time and submit it for approval and then move onto the next or you can submit a batch of items at once. In the example screenshot below, the Assignment is being driven by department. Each Driver visible to you must be completed and approved in order for you to have completely finished your Assignment, The Drivers that meet validation rules and have at least been retrieved and saved once will show a Validation Status of “Ok”. Items without an “Ok” or that display a warning or error Validation Message cannot be submitted.
- If you believe your data passes validation but do not see the “Ok” press the “Refresh” button at the bottom of the Assignment Status window.
- If the task passes validation, once selected, the Submit button will be enabled. Press “Submit” to submit your Driver for approval.
- Add a Submission Note.
- Press the “Confirm” button to submit.
- Repeat for other Drivers, as necessary.
- Press the “Close” button to close the window.
The possible Current Status values for any given Driver are:
| Status |
Description |
| In Progress |
Available to be opened and edited. |
| Pending |
Available to be opened and viewed but has not been submitted to you from a lower level, so cannot be edited or approved. |
| Submitted |
Submitted for approval. Can still viewed but locked from editing. |
| In Progress (Rejected) |
Initially submitted but rejected by an approver. Now available to be re-edited. |
| Approved (Pending} |
Submitted and approved by the next approval in the chain but has not received a final approval. |
| Approved (Final) |
Submitted and fully approved. |
NOTE: You can reopen the Assignment Status window as often as you like to see the current status of your submission(s).
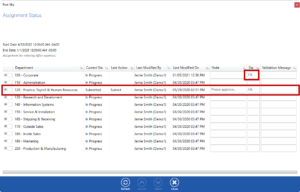
Assignment Status Window
Reviewing and Approving/Rejecting an Assignment
In most situations, an Assignment will be created for multiple users where the user entering the data initially is different from the user who is approving the data. The number of users and number of Approval Levels involved will vary from organization to organization and business process to business process.
The example below will utilize a simple scenario involving two users and a two-level approval process where Level 1 is the first layer and used for data entry and Level 2 is the second layer and where a user different from that in Level 1 will approve the data. Depending on your particular configuration, Approvers/Reviewers may or may not have the ability to edit the data.
The steps for reviewing a submission are similar to those of submitting for review discussed earlier. They are as follows:
- As an Approver/Reviewer open the “Hub”.
- Select your “Assignment” and the “Level 2” (depending upon your situation, you may be Level 2, 3 or higher)
- Press the “View Status” button at the bottom of the screen to view the Assignment Status window.
- At this stage you will see that the Submit and Reject buttons are not enabled. This is because an Approver must open the Assignment and retrieve data at least once for any given Driver before being allowed to Approve or Reject the submission. This is by design and intended to ensure that someone does not mistakenly grant approval without at least first reviewing what they are approving.
- Close the “View Status” window.
- Select the “Assignment” and “Level 2”.
- Press the “Open” button to open the Assignment.
- Retrieve the data that will later be approved. Review to ensure it is correct and eligible to be approved.
- Close the “Assignment” and open the “Hub”
- Select the “Assignment” and “Level 2”.
- Click “View Status”
- Click the “Refresh” button at the bottom of the Assignment Status window.
- Select a Driver that was reviewed (e.g., Department) in the Assignment Details section. You will see the Submit button is now enabled.
- Click the “Submit” button to approve or the “Reject” button to reject.
- Add a “Submission Note”.
- Press the “Confirm” button to submit.
- Repeat for other Drivers, as necessary.
- Press the “Close” button to close the window.